Working With Fonts

Installing
fonts on a Macintosh is as simple as dropping all the necessary
files in the Fonts folder. Follow these steps for success:
- Open
the System Fonts folder (open your Macintosh
Hard Drive, then open System Folder,
then open Fonts).
- You
will be able to see all the currently
installed fonts.
- Select
the folder containing the fonts you want
to install. Open this folder. Select the screen
and printer fonts needed.
- Drag
and drop these fonts into the System
Fonts folder. Hold down the option key while dragging,
to copy the fonts instead of moving them.
- Your
newly installed fonts will now be visible
within the System Fonts folder. You may get a reminder
telling you that any currently running
applications
won't be able to use the new fonts until
you close and restart them

Installing fonts on
a Windows system is very straightforward because it doesn't require
any additional software. Simply follow the procedure below:
- Click
Start > Settings > Control Panel > Fonts
to open the Windows Fonts folder. You will
see
the currently installed fonts.
- Click
File > Install New Font....
- In
the dialog you will see two drop-down
boxes, one for Drives and another for Folders.
Navigate
to the drive and folder containing the
fonts you wish to install.
- Select
the fonts you wish to install and click "OK".
That's all there is to it. The dialog will
close and you will see your fonts in the Windows
Fonts folder. If the "Copy fonts to Fonts folder" box
is checked, the fonts will be copied there
.

There are several useful
font utilities for Macintosh and Windows platforms. Most basic
of these is a font manager for Type 1 fonts. Since Type 1 fonts
are not native to either the Macintosh or Windows 95/98 operating
systems, Type 1 fonts won't be accessible without it.
Good
Font Manager
ATM® Lite is
freely available for both the Mac or PC from
the Adobe. If you plan to use Type 1 fonts on
the Mac you will need ATM whether or not you
install a more powerful font manager. Shown below
is a screen shot of ATM Lite for the Mac:
Better
Font Manager
ATM
Deluxe is also available for both the Mac or PC from
the Adobe. ATM Deluxe will let you organize fonts
in sets. This is very handy because you can activate
and deactivate them much more easily. It will
also search and find all your fonts and make
them available to applications when they are
needed. ATM will auto-activate fonts. If a document
contains references to uninstalled fonts, ATM
will activate them automatically.
Best
Font Manager
Both Diamond Soft Font Reserve and Extensis® Suitcase™ are
professional font management software applications. Note: ATM Lite is
required on the Mac even if using Font Reserve or Suitcase. Recently,
Font Reserve, has been noted as the leading tool. The features that make
Font Reserve unique are:

Before sending your
job to TSG, you will need to organize the fonts. This is achieved
by placing printer fonts and screen font suitcases inside a fonts
folder that is sent along with your files. On the Macintosh,
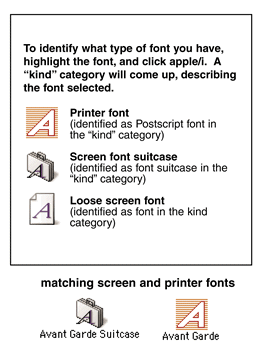
screen fonts exist in suitcases. A suitcase is a special kind
of folder made especially for fonts. A suitcase can contain a
mix of Type 1 and TrueType fonts.
- Or,
instead of opening each suitcase, it may be easier
to combine the contents of all the like font
suitcases into just one suitcase. This will effectively
eliminate most font conflicts.
- Be
aware that for each separate screen font face,
there must be a matching printer font with it,
in order for the type to output as it should.


Typography
basics
A wealth of information on fonts provided by Adobe.
Typography
basics: Typeface classification
February 2001 How typefaces are classified and the differences between typeface
classifications.

 See also "Solving the Mystery of Missing Fonts in EPS Files" See also "Solving the Mystery of Missing Fonts in EPS Files"
|